Automating Invoice Processing with Power Automate AI Flows
Processing invoices is one of the most common but also one of the most time-consuming tasks in any finance or business department. Manually typing invoice numbers, vendor names, or due dates into an ERP or Excel sheet not only takes time but is also error-prone. Check out some of our FREE templates and materials. With Power Automate and AI Builder , you can automate this process: invoices get uploaded (or even received by email), an AI model extracts key information, and the results can be...

Processing invoices is one of the most common but also one of the most time-consuming tasks in any finance or business department. Manually typing invoice numbers, vendor names, or due dates into an ERP or Excel sheet not only takes time but is also error-prone.
Check out some of our FREE templates and materials.
With Power Automate and AI Builder, you can automate this process: invoices get uploaded (or even received by email), an AI model extracts key information, and the results can be sent by email or stored in your system of choice.
In this post, we’ll build an AI-powered invoice processing flow step by step, explain how it works, and explore what else can be achieved with this automation.
Why Automate Invoice Processing?
Before diving into the steps, let’s quickly outline why automation here makes sense:
Efficiency – Reduce the hours spent on manual entry.
Accuracy – AI Builder reads fields consistently, reducing typos.
Scalability – Easily handle dozens or hundreds of invoices daily.
Integration – Seamlessly connect with Outlook, SharePoint, Dataverse, or ERP systems.
This means your finance team can focus on approvals and decision-making, not repetitive data entry.
Step 1: Manually Trigger a Flow
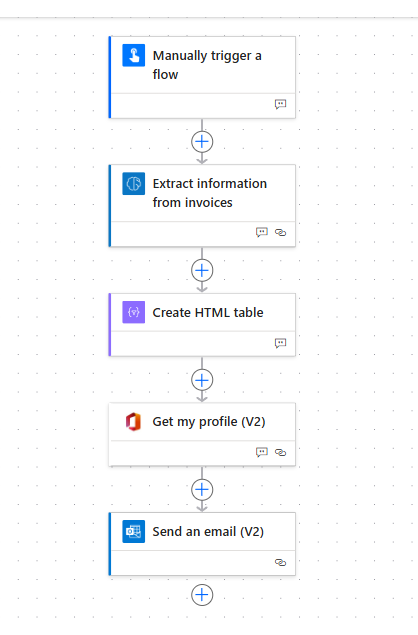
Our journey starts with the Manually trigger a flow action in Power Automate.
This is perfect for testing the process: you upload an invoice file (PDF or image) directly when running the flow. Later, you can switch the trigger to something automated, such as:
When a new file is added to a SharePoint folder
When an email with an invoice attachment arrives
💡 Pro Tip: Start with a manual trigger during development. Once you’re confident it works, replace it with an automatic trigger to achieve true “hands-off” automation.
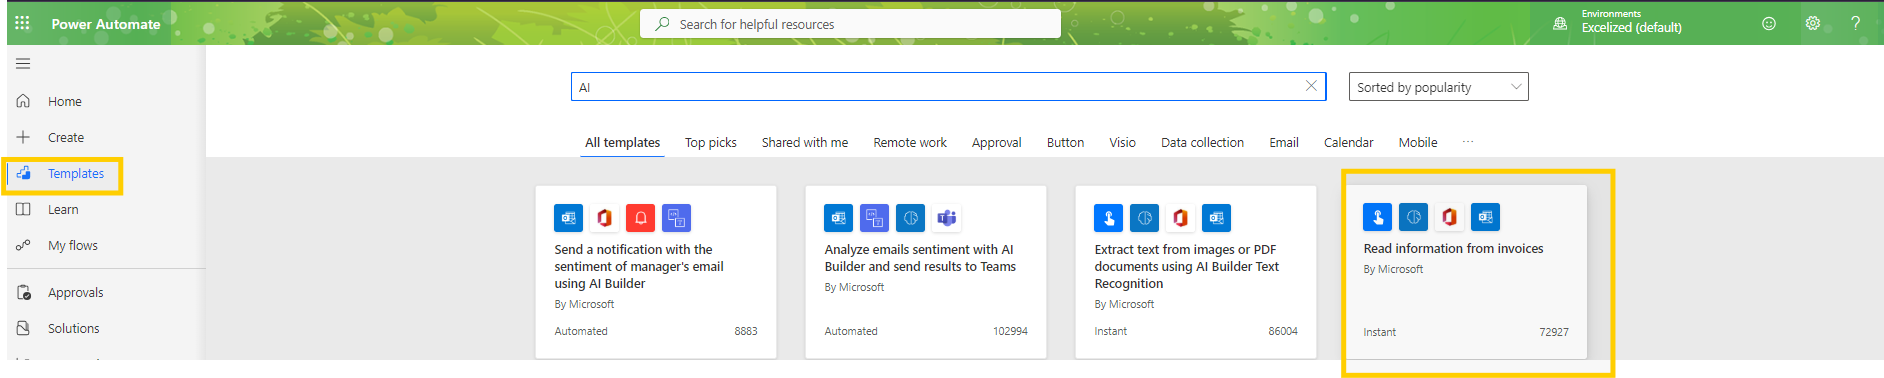
Step 2: Extract Information from Invoices (AI Builder)
Next, we add the AI Builder action: Extract information from invoices.
This step uses Microsoft’s pre-trained invoice processing model. No training needed — the AI already knows how to recognize invoice fields like:
Invoice number
Vendor name
Invoice date
Due date
Total amount
Line items (e.g., product names, quantities, prices)
When the invoice file is passed into this action, AI Builder analyzes it and returns structured data.
Example output:
Field | Value |
Invoice Number | INV-2025-1047 |
Vendor Name | Contoso Ltd. |
Invoice Date | 01-Oct-2025 |
Due Date | 30-Oct-2025 |
Total Amount | € 12,350.00 |
This is where the magic happens: instead of manually entering these details, you now have clean, usable data extracted directly from the invoice.
Step 3: Create an HTML Table
Raw data isn’t always easy to read. That’s why the next step is to Create HTML table in Power Automate.
This action takes the structured output from AI Builder and converts it into a neat HTML table. The table can then be inserted directly into an email or document.
📌 Example HTML Table (from the invoice above):
Invoice Number | Vendor Name | Invoice Date | Due Date | Total Amount |
INV-2025-1047 | Contoso Ltd. | 01-Oct-2025 | 30-Oct-2025 | € 12,350.00 |
💡 Advanced tip: You can use a Compose action instead if you want to fully customize the table with colors, company logos, or conditional formatting.
Step 4: Get My Profile (V2)
The flow then uses the Get my profile (V2) action from Office 365.
Why is this useful? It automatically retrieves your name, email, and other details from Microsoft 365. This allows the flow to personalize the email sender details without needing manual configuration.
For example, the email can say:
“Sent by John Smith (Finance Automation)”
This helps keep communication clear and professional, especially in larger organizations.
Step 5: Send an Email with Extracted Data
Finally, the Send an email (V2) action sends the results.
Configuration details:
To: Choose your own email or the finance team’s shared mailbox.
Subject: Invoice Extracted – [Invoice Number]
Body: Insert the HTML table created earlier.
📌 Example Email:
Subject: Invoice Extracted – INV-2025-1047
Hello,
Here are the invoice details extracted by the flow:
Invoice Number | Vendor Name | Invoice Date | Due Date | Total Amount |
INV-2025-1047 | Contoso Ltd. | 01-Oct-2025 | 30-Oct-2025 | € 12,350.00 |
Best regards,Your Power Automate Flow
This means your team can check invoice details right in their inbox, without opening the invoice file itself.
How It Works Behind the Scenes
At a high level, this flow works in three layers:
Input Layer (Trigger) – Defines how invoices are received (manual, email, SharePoint, etc.).
AI Layer (AI Builder Model) – Uses machine learning to extract structured data from unstructured invoice files.
Output Layer (Actions) – Formats the data and sends it via email, stores it in Excel, Dataverse, or pushes it into other systems.
Microsoft handles the AI model training in the background, so you just plug it into your flow without worrying about model development.
What Else Can Be Achieved?
This simple invoice-to-email scenario is just the beginning. With the same AI Builder model, you can extend automation in many directions:
1. Save Data in Excel or Dataverse
Instead of emailing the results, write the extracted data directly into:
A SharePoint list
An Excel file in OneDrive
A Dataverse table
This creates a searchable archive of invoices without manual work.
2. Integrate with ERP or Accounting Systems
Use connectors to push invoice details directly into Dynamics 365, SAP, or other ERP systems, eliminating data re-entry entirely.
3. Trigger Approvals
Add a conditional step:
If invoice amount > €10,000 → Send for manager approval.
Otherwise → Store and mark as ready for payment.
This makes the flow not just informational, but part of your financial governance.
4. Combine with Power BI
Store invoice details in a database and connect it to Power BI. This allows you to build dashboards showing:
Invoice volume by vendor
Average invoice amounts
Payment due timelines
5. Automated Archiving
Save the processed invoice PDFs in a structured SharePoint library (e.g., by vendor or year) with metadata populated from AI Builder.
Benefits of Using AI Flows for Invoices
Quick setup – No need to train your own model.
Flexibility – Works with many file formats (PDFs, scanned images).
Adaptability – Can be combined with hundreds of Power Automate connectors.
Scalable – From one invoice a day to thousands per month.
Conclusion
Power Automate with AI Builder allows you to transform invoice processing from a manual, error-prone task into a streamlined, intelligent workflow.
By following the five steps — triggering the flow, extracting invoice data, creating a table, retrieving profile information, and sending an email — you can have a fully functional invoice automation in under an hour.
From there, the possibilities expand: integration with ERP, Power BI dashboards, automated archiving, or conditional approvals.
Automation isn’t just about saving time — it’s about building smarter processes that scale with your business. With Power Automate AI Flows, invoice management becomes faster, more accurate, and far less stressful.
Do you need a starter Power Automate Toolkit with how-to guide, practical examples and cheatsheet? Just with a slight adjustment to the quick and efficient flows. Check it out.

Mastering DAX Queries in Power BI: Structure, Logic & Best Practices
Read insight